Getting Started with iOS v2.2.x
Learn how to set up your iOS app to process payment transactions using QuantumPay.
Table of contents
Requirements
- SDKs
- QuantumPayClient.xcframework
- QuantumPayMobile.xcframework
- QuantumPayPeripheral.xcframework
- QuantumSDK.xcframework
- Xcode 11+ / iOS 13+ / Swift 5.0+
- Infinite Peripherals payment device
- Infinite Peripherals developer key for your app bundle ID
- Payment related credentials: username/email, password, service name and tenant key
*If you are missing any of these items, please contact Infinite Peripherals
Project Setup
Before we jump into the code we need to make sure your Xcode project is properly configured to use the QuantumPay frameworks. Follow the steps below to get you set up.
Adding the QuantumPay SDKs
-
Open Xcode and create a new folder to put the frameworks in. If you have a place for frameworks already you can skip this.
-
Drag the QuantumPay frameworks into your folder.
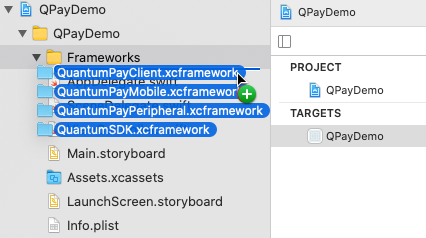
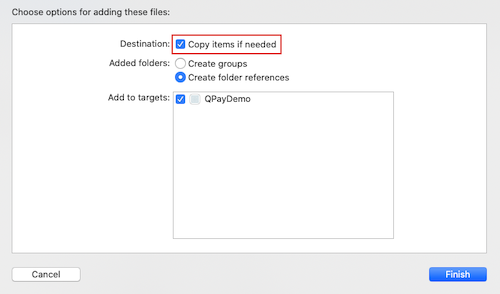
- Make sure when prompted you enable “Copy items if needed”.
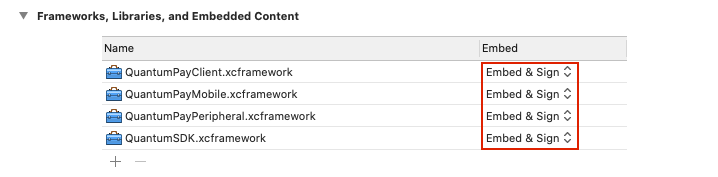
- Go to your project’s General tab and scroll down to the Frameworks, Libraries and Embedded Content section. For each framework we just added set the Embed field to “Embed & Sign”.
Add MFi protocols to Info.plist
Go to your project’s Info.plist file and add a new entry for “Supported external accessory protocols” using the following values. Note: in Xcode 13.0+ this has been moved to the “Info” tab in your project’s settings.
com.datecs.pengine
com.datecs.linea.pro.msr
com.datecs.linea.pro.bar
com.datecs.printer.escpos
com.datecs.pinpad

Add Privacy entries to Info.plist
Also in your project’s Info.plist file we need to add the four (4) privacy tags listed below. You can enter any string value you want or copy what we have below. Note: in Xcode 13.0+ this has been moved to the “Info” tab in your project’s settings.
"Privacy - Bluetooth Always Usage Description"
"Privacy - Bluetooth Peripheral Usage Description"
"Privacy - Location When In Use Usage Description"
"Privacy - Location Usage Description"

Processing a Payment
At this point, your Xcode project should be configured and ready to use the QuantumPay libraries. This next section will take you through some initial setup all the way to processing a payment.
Initialize the SDKs
First, initialize the SDKs with valid keys provided by Infinite Peripherals. This is a required step before you are able to use other functions from the SDKs. If you do not have these keys yet, please contact Infinite Peripherals.
// Create tenant
let tenant = Tenant(hostKey: "Host key", tenantKey: "Tenant key")

// Initialize QuantumPay
InfinitePeripherals.initialize(developerKey: "Developer key", tenant: tenant)
Create Payment Device
Now initialize a payment device that matches the hardware you are using. The current supported payment devices are: QPC150, QPC250, QPP400, QPP450, QPR250, QPR300. Note that this step is different for payment devices that are connected with Bluetooth LE.
- Initialize QPC150, QPC250 (Lightning connector)
let paymentDevice = QPC250()
- Initialize QPP400, QPP450, QPR250, QPR300 (Bluetooth LE) by supplying its serial number so the
PaymentEnginecan search for and connect to it. On first connection, the app will prompt you to pair the device. Be sure to press “OK” when the pop-up is shown. To complete the pairing, if using a QPR device, press the small button on top of the device opposite the power button. If using a QPP device, press the green check mark button on the bottom right of the keypad.
// The device serial number is found on the label on the device.
let paymentDevice = QPR250(serial: "2320900026")
Create Payment Engine
The payment engine is the main object that you will interact with to send transactions and receive callbacks.
do {
    try PaymentEngine.builder()
        /// Reset and release all old hooks before building a new engine.
        /// Optional, but recommended if rebuilding the PaymentEngine.
        .reset()
        /// The server where the payment is sent to for processing
        .server(server: ServerEnvironment.test)
        /// Specify the username and password that will be used for authentication while registering peripheral devices with the Quantum Pay server. The provided credentials must have Device Administrator permissions. Optional.
        .registrationCredentials(username: PaymentConfig.username, password: PaymentConfig.password)
        /// Add a supported peripheral for taking payment, and specify the available capabilities
        /// If you want to auto connect the payment device, set the autoConnect to true,
        /// otherwise set to false and manually call paymentEngine.connect() where approriate in your workflow.
        .addPeripheral(peripheral: self.paymentDevice, capabilities: self.paymentDevice.availableCapabilities!, autoConnect: false)
        /// Specify the unique POS ID for identifying transactions from a particular phone or tablet. Any string value
        /// can be used, but it should be unique for the instance of the application installation. A persistent GUID is
        /// recommended if the application does not already have persistent unique identifiers for app installs.
        /// Required.
        .posID(posID: PaymentConfig.posId)
        /// Specify the Mobile.EmvApplicationSelectionStrategy to use when a presented payment card supports multiple EMV applications and the user or customer must select one of them to be able to complete the transaction. Optional.
        .emvApplicationSelectionStrategy(strategy: .defaultStrategy)
        /// Specify the time interval that the Peripheral will wait for a card to be presented when a transaction is
        /// started. Optional. The default value is 1 minute when not specified.
        .transactionTimeout(timeoutInSeconds: 30)
        /// Specify the StoreAndForwardMode for handling card transactions. Optional.
        .queueWhenOffline(autoUploadInterval: 60)
        /// Add location to each transactions.
        /// Make sure to add the required Privacy - Locations in plist
        .assignLocationsToTransactions()
        /// When there is an exception that the SDK doesnt handle, this handler will get called
        /// The app should decide what to do in this situation. You can either restart the transaction or reupload stored transactions
        .unhandledExceptionHandler(handler: { transactions, errors, warnings in
            // Handle the unexpected exception here.
            // Show user a message to redo the transaction?
        })
        /// If this build function is successful, the PaymentEngine will be passed in the completion block.
        .build(handler: { (engine) in
            // Save the created engine object
            self.pEngine = engine
        })
}
catch {
    print("Error creating payment engine: \(error.localizedDescription)")
}
Setup Handlers
Once the PaymentEngine is created, you can use it’s handlers to track the operation. The PaymentEngine handlers will get called throughout the payment process and will return you the current state of the transaction. You can set these handlers in the completion block of the previous step.
ConnectionStateHandlerwill get called when the connection state of the payment device changes between connecting, connected, and disconnected. It is important to make sure your device is connected before attempting to start a transaction.self.pEngine!.setConnectionStateHandler(handler: { (peripheral, connectionState) in // Handle connection state })TransactionResultHandlerwill get called after the transaction is processed. TheTransactionResultstatus will disclose whether the transaction was approved or declined.self.pEngine!.setTransactionResultHandler(handler: { (transactionResult) in // Handle the transaction result // transactionResult.status provides the transaction result // transactionResult.receipt provides the online receipt when transactionResult.state == .approved })TransactionStateHandlerwill get called when the transaction state changes. TheTransactionStaterepresents a unique state in the workflow of capturing a transaction. These include “waitingForCard, waitingForPin, onlineAuthorization, etc.self.pEngine!.setTransactionStateHandler(handler: { (peripheral, transaction, transactionState) in // Handle transaction state })PeripheralStateHandlerwill get called when the state of the peripheral changes during the transaction process. ThePeripheralStaterepresents the current state of the peripheral as reported by the peripheral device itself. These include “idle”, “ready”, “contactCardInserted” etc.self.pEngine!.setPeripheralStateHandler(handler: { (peripheral, state) in // Handle peripheral state })PeripheralMessageHandlerwill get called when there is new message about the transaction throughout the process. The peripheral message tells you when to present the card, if the card read is successful or failed, etc. This usually indicates something that should be displayed in the user interface.self.pEngine!.setPeripheralMessageHandler(handler: { (peripheral, message) in // Handle peripheral message })SignatureVerificationHandlerwill get called when the transaction requires a signature. Here, your app can display a signature capture screen to let user sign for the transaction. Once the signature is captured, invoke theverification.signatureAccepted()method to tell the SDK that signature is captured or callverification.signatureRejected()to decline the transaction.// Show a signature capture screen? // If signature is accepted, call verification.signatureAccepted() // Or reject signature and decline the transaction verification.signatureRejected()
Connect to Payment Device
Now that your payment engine is configured and your handlers are set up, lets connect to the payment device. Please make sure the device is turned on and connected. We need to connect to the payment device prior to starting a transaction. The connection state will be returned to the ConnectionStateHandler that we set up previously. If you didn’t set autoConnect = true when adding the peripheral, you will need to call PaymentEngine.connect() before starting a transaction.
self.pEngine!.connect()
Create an Invoice
It is time to create an invoice. The invoice object holds information about the purchase order and the line items in the order.
let invoice = try self.pEngine!
                    // Build invoice with a reference number. This can be anything.
                    .buildInvoice(reference: invoiceNum)
                    // Set company name
                    .companyName(companyName: "ACME SUPPLIES INC.")
                    // Set purchase order reference. This can be anything to identify the order.
                    .purchaseOrderReference(reference: "P01234")
                    // A way to add item to the invoice
                    .addItem(productCode: "SKU1", description: "Discount Voucher for Return Visit", unitPrice: 0)
                    // Another way to add item to the invoice
                    .addItem { (itemBuilder) -> InvoiceItemBuilder in
                        return itemBuilder
                        /// Specify the product or service code or SKU for the invoice item. Required.
                        .productCode("SKU2")
                        /// Describe the product or service on the invoice item. Required.
                        .productDescription("In Store Item")
                        /// Specify the SaleCode for the product or service on the invoice item.
                        /// Optional. The default value is "Sale" when not provided.
                        .saleCode(SaleCode.S)
                        /// Specify the unit price of the invoice item in the currency of the Transaction. Required.
                        .unitPrice(amount)
                        /// Specify the quantity sold of the invoice item. Optional. The default value is 1 when not provided.
                        .quantity(1)
                        /// Set the discount amount for the item.
                        .setDiscountTotal(0)
                        /// Set the gross amount for the item. The amount should be manually calculated based on local regulation.
                        .setGrossTotal(amount)
                        /// Set the net amount for the item. The amount should be manually calculated based on local regulation.
                        .setNetTotal(amount)
                        /// Set the tax amount for the item. The amount should be manually calculated based on local regulation.
                        .setTaxTotal(0)
                        /// Specify the UnitOfMeasure for the quantity of the invoice item.
                        /// Optional. The default value is UnitOfMeasure.Each when not provided.
                        .unitOfMeasureCode(.Each)
                    }
                    // Calculate totals for Gross, Net, Tax, Discount for all items on the invoice.
                    .calculateTotals()
                    // Builds invoice instance with the provided values.
                    .build()
Create a Transaction
The transaction object holds information about the invoice, the total amount for the transaction and the type of the transaction (e.g.: sale, auth, refund, etc.)
let transaction = try self.pEngine!.buildTransaction(invoice: invoice)
                        // The transaction is of type Sale
                        .sale()
                        // The total amount of for the transaction. This is the amount that will be taken out from the card.
                        .amount(1.00, currency: .USD)
                        // A unique reference to the transaction. This cannot be reused.
                        .reference("A reference to this transaction")
                        // Date and time of the transaction
                        .dateTime(Date())
                        // The service code generated by Infinite Peripherals
                        .service("service")
                        // Some information about the transaction that you want to add
                        .metaData(["orderNumber" : invoiceNum, "delivered" : "true"])
                        // Build the transaction
                        .build()
Start Transaction
Now that everything is ready we can start the transaction and take payment. Watch the handler messages and status updates to track the transaction throughout the process.
try self.pEngine!.startTransaction(transaction: txn) { (transactionResult, transactionResponse) in
    // Handle the transaction result and response
    // transactionResult.status discloses the state of the transaction after being processed. See `TransactionResultStatus` for more info.
    // transactionResponse discloses the server's response for the submitted transaction. If an error occurs, the object will contain the
    // error's information. See `TransactionResponse` for more info.
    // ....
}
Transaction Receipt
Once the transaction is completed and approved, the receipt is sent to the TransactionResultHandler callback.
// The url for customer receipt
transactionResult.receipt?.customerReceiptUrl

// The url for merchant receipt
transactionResult.receipt?.merchantReceiptUrl
Disconnect Payment Device
Now that the transaction is complete you are free to disconnect the payment device if you wish. Please note that this should not be called before or during the transaction process. It is not recommended to disconnect the payment device if you are doing transaction continuously. Reconnection to a payment device might take some time depends on the type of the device you have (e.g.: BLE device takes longer time to discover and connect)
self.pEngine!.disconnect()
Scanning a Barcode
Some of our payment devices also support barcode scanning (e.g., QPC150, QPC250). In order to receive the barcode data, you will need to set your class to conform to the protocol IPCDTDeviceDelegate and add the class instance as a delegate that will receive the data when scanned. Note that the scan button will not work if it is not properly connected to the application.
// Add class instance as delegate
self.paymentDevice.device.addDelegate(self)
Once a barcode is scanned, it will be sent to this delegate method:
func barcodeData(_ barcode: String!, type: Int32) {
    // Handle the barcode
}