QuantumPay Browser
This guide describes how to get started using Quantum Pay Browser so your website can interact with QuantumPay.
Table of contents
Integration Steps
In order to use Quantum Pay Broswer with your website you will need to do 3 things:
Add the JavaScript libraryObsolete from ver 1.0.0.6 -> QuantumPay browser adds the JS code needed.- Add JavaScript code that utilizes functions provided by the library
- Link your website to the app
This quick start guide will go over these 3 steps, in order, and give you some sample code for some of the more common use cases of Quantum Pay Browser.
Adding QBrowser.js Obsolete from ver 1.0.0.6 -> QuantumPay browser adds the JS code needed.
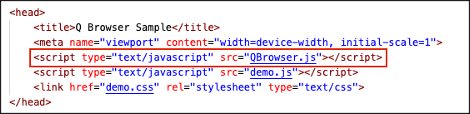
In order to use Quantum Browser with your website you will need to include QBrowser.js. This file can be found included with our HTML demo here: link. Simply add the JavaScript file to your website like in the image below and you will have access to all the functions it provides.
About the Demo
If you want to see QBrowser.js in action before making changes to your own code, feel free to check out our HTML demo linked above. The code provided in the demo is the same code used for the default page in the app and should give you a good idea of how to use QBrowser.js and its functions.
Connecting Your Website
When you are ready to connect your website to Quantum Pay Browser, open the app on your device and follow the steps below.

- Click “Open Settings”.
- Type in your website’s URL and click “Save Settings”
- If you ever want the app to open to the default HTML page again, see Settings part below.
Using QBrowser.js
QBrowser.js will handle all the comunication with QuantumPay Browser need by your application.
Intro
QBrowser.js uses callback to return data and errors. For example, this function call will accept 2 functions, the first one for successful call, the second for failure.
paymentEngine.build(engineBuildSuccess, engineBuildError);
function engineBuildSuccess() {
    console.log("PaymentEngine is ready!");
}

function engineBuildError(message) {
    alert("PaymentEngine build failed: " + message);
}
React usage
Callback functions need be global, from a local const for example:
const engineBuildSuccess = () => {
    console.log("PaymentEngine is ready!");
};
window.engineBuildSuccess = engineBuildSuccess;

const engineBuildError = (message) => {
    alert("PaymentEngine build failed: " + message);
};
window.engineBuildError = engineBuildError;
Settings
Settings are loaded using provided page, that can accessed by calling QBrowser.Settings.open() from anywhere in code. If you want to use code to update anything you can do by:
QBrowser.Settings.get(loadSettings); // call this from anywhere in your code.
function loadSettings(settings) {
    Object.entries(data).forEach(([key, value]) => console.log(key, value));
    document.getElementById("url").value = data.DefaultUrl;
    document.getElementById("username").value = data.Username;
    document.getElementById("password").value = data.Password;
    document.getElementById("tenantKey").value = data.TenantKey;
    document.getElementById("hostKey").value = data.HostKey;
    document.getElementById("service").value = data.Service;
    document.getElementById("autoReconnect").checked = data.AutoReconnect;
    document.getElementById("serialNumber").value = data.SerialNumber;
    document.getElementById("showNavigation").checked = data.ShowNavigation;
}

//Save settings:
function saveSettings() {
    //Always send string as value.
    QBrowser.Settings.set({
        "DefaultUrl": document.getElementById("url").value, //Set this to '' to see DefaultPage.
        "Username": document.getElementById("username").value,
        "Password": document.getElementById("password").value,
        "TenantKey": document.getElementById("tenantKey").value,
        "HostKey": document.getElementById("hostKey").value,
        "Service": document.getElementById("service").value,
        "AutoReconnect": document.getElementById("autoReconnect").checked.toString(),
        "SerialNumber": document.getElementById("serialNumber").value,
        "ShowNavigation": document.getElementById("showNavigation").checked.toString()
    });
}


//Save settings can be done also by calling with only part of the settings:
QBrowser.Settings.set({"ShowNavigation": "true"});
Auto Reconnect
AutoReconnect - (use “True” or “False”) When set to “True” QPayBrowser will keep and use the last connected SerialNumber to connect automatically to the Peripheral.
SerialNumber - This can be set from settigns or by sending a serial number to .addPeripheral see below.
Remarks:
- If
AutoReconnectis “False” or ifSerialNumberis empty/null, calling.addPeripheralwith the second parameter null will use USB connection to connect to peripheral. - When
AutoReconnectis “True” andSerialNumberhas value, calling.addPeripheralwith the second parameter null will use the BLE connection to connect to the peripheral with the savedSerialNumber. - When
AutoReconnectis “True”, calling.addPeripheralwith a serialNumber as second parameter, if the connection is successfulSerialNumbervalue will be changed to the value used in.addPeripheral.
Battery Level
To get the battery level of a connected peripheral call QBrowser.Settings.getBatteryLevel.
QPay
Initialization
Method initialize must be called first before utilizing any other QPay functions. This will initilize QPay module with credentials from settings. When the app start, the QuantumPay module must be initialized if payment is required. This initialization feeds the credentials and tenant keys to the QuantumPay module. The credentials will be provided by IPCMobile.
var qpay = QBrowser.QPay;
qpay.initialize();
Setup PaymentEngine
- Set Event Handlers
Set transaction callback functions to receive update throughout the payment process.
var paymentEngine = QBrowser.QPay.PaymentEngine;
paymentEngine.setConnectionStateHandler(connectionStateHandler);
paymentEngine.setTransactionResultHandler(transactionResultHandler);
paymentEngine.setTransactionStateHandler(transactionStateHandler);
paymentEngine.setPeripheralStateHandler(peripheralStateHandler);
paymentEngine.setPeripheralMessageHandler(peripheralMessageHandler);
- Build it
Build a PaymentEngine object by setting its behaviour.
paymentEngine.builder(qpayError)
    //For BLE connection use device's serial number as the second parameter, instead of "null".
    .addPeripheral(qpay.Peripherals.QPP450, null, qpayError)
    .server(qpay.ServerEnvironments.TEST, qpayError)
    .transactionTimeout(30, qpayError)
    .emvApplicationSelectionStrategy(qpay.EmvApplicationSelectionStrategy.FIRST, qpayError)
    .storeAndForward(qpay.StoreAndForwardMode.WHEN_OFFLINE, 60, qpayError)
    .build(engineBuildSuccess, engineBuildError);
Invoice
Invoice and Transaction must be built after PaymentEngine has successfully created. Depending on your gateway / processor agreement, the invoice data may be mandatory.
- Setup
var invoiceBuilder = QBrowser.QPay.PaymentEngine.buildInvoice("IV12345", qpayError); invoiceBuilder.companyName("ACME", qpayError); invoiceBuilder.purchaseOrderReference("PO123", qpayError); - Add Items
Use this once per item:
let invoiceItem = new InvoiceItem(
    "SKU123",
    "VIP Ticket",
    QBrowser.QPay.SaleCode.SALE,
    1,
    QBrowser.QPay.UnitOfMeasure.EACH,
    1.50,
    false,
    1.50,
    0.00,
    0.00,
    1.50
);
invoiceBuilder.addItem(invoiceItem, qpayError);
- Build It
Build invoice with provided params above
invoiceBuilder.build(invoiceBuildSuccess, invoiceBuildError);
Transaction
Transaction must be built after PaymentEngine has successfully created.
- Build
Build transaction with previous created invoice. If invoice is null, transaction will be created without invoice. Depending on your gateway / processor agreement, the invoice data may be mandatory.
function invoiceBuildSuccess(invoice) {
    buildTransaction(invoice);
}

function buildTransaction(invoice) {
    var transactionBuilder = QBrowser.QPay.PaymentEngine.buildTransaction(invoice, qpayError);
    transactionBuilder.transactionType(QBrowser.QPay.TransactionType.SALE, null, qpayError);
    transactionBuilder.amount(invoice.net.toString(), "USD", qpayError);
    transactionBuilder.build(transactionBuildSuccess, transactionBuildError);
}
- Start Transaction
After building a transaction we can start it:
QBrowser.QPay.PaymentEngine.startTransaction(transactionResponse);
// if transaction fail for any reason, the response object will contain error info on why the transaction has failed.
function transactionResponse(response) {
    console.log("Response: " + JSON.stringify(response));
}
- Auth/Capture Transactions
For “Auth/Capture” transactions you should follow the same steps like a regular transaction with the following differences:
- When Building transaction use
QBrowser.QPay.TransactionType.AUTHfor the first parameter intransactionBuilder.transactionType. - When ready to Capture the transaction build a transaction using the Auth TransactionID and use
QBrowser.QPay.TransactionType.CAPTUREfor the first parameter intransactionBuilder.transactionType.
function captureTransaction() {
    setTransactionType(QBrowser.QPay.TransactionType.CAPTURE);
    var transactionBuilder = QBrowser.QPay.PaymentEngine.buildTransaction('', qpayError);
    transactionBuilder.transactionType(QBrowser.QPay.TransactionType.CAPTURE, transaction.ID, qpayError);
    transactionBuilder.amount(transaction.invoice.net.toString(), "USD", qpayError);
    //After building start transaction directly:
    transactionBuilder.build(startTransaction, transactionBuildError);
}